1
Enter the principal amount net of fees
Input the actual amount the borrower will receive after deducting any origination fees or closing costs. This is the figure on which all interest and payment calculations are based.
💡 If the lender is deducting an origination fee from disbursement, calculate it separately and disclose it in the APR — not in the principal figure used for amortization.
2
Set the interest rate type and annual rate
Choose fixed or variable. For a fixed-rate loan, enter the annual rate as a decimal (e.g., 0.075 for 7.5%). For a variable rate, state the benchmark index, the spread, and the adjustment frequency.
💡 Confirm the day-count convention with the lender before entering the rate — a 360-day basis produces a slightly higher effective rate than 365 for the same nominal rate.
3
Define the term and maturity date
Enter the loan duration in months and calculate the exact maturity date from the disbursement date. Confirm the maturity date in both the calculator and the loan agreement.
💡 Use the actual calendar date rather than 'X months from signing' — month-count ambiguity is a common source of final-payment disputes.
4
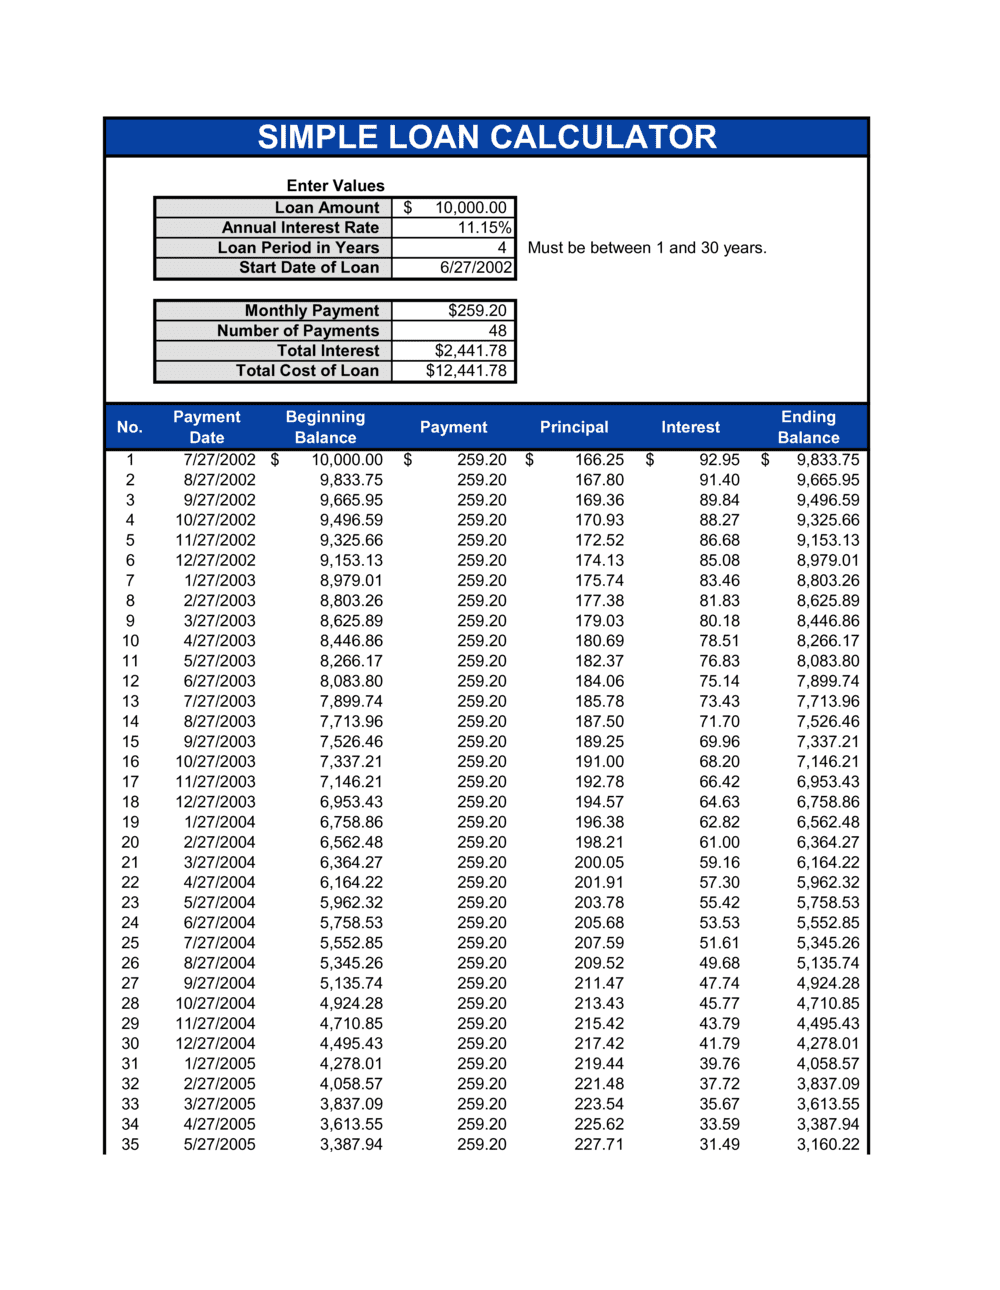
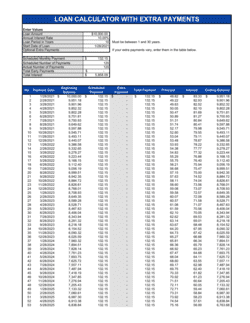
Select payment frequency and generate the schedule
Choose monthly, bi-weekly, or quarterly payment frequency. The template will calculate the periodic payment amount and generate the full amortization table showing each payment's principal-interest split and the running balance.
💡 Bi-weekly payments result in 26 payments per year rather than 24, which meaningfully reduces total interest paid on longer-term loans — run both scenarios before committing.
5
Add prepayment and late-fee terms
Document whether prepayment is permitted without penalty, the penalty formula if applicable, and the late-fee rate and grace period. These terms must match what is stated in the accompanying loan agreement.
💡 Check your jurisdiction's usury cap before setting a late fee — most states cap penalty interest between 18% and 25% APR equivalent.
6
Describe collateral and reference security filings
If the loan is secured, identify the collateral with enough specificity for a UCC-1 filing or title registration, and reference any separate security agreement by date.
💡 For business equipment or receivables collateral, file the UCC-1 financing statement in the borrower's state of incorporation — not just the state where the collateral is located.
7
Attach the amortization schedule as Schedule A
Print or export the completed amortization table as Schedule A and attach it to the signed loan agreement. Both parties should initial the schedule at execution.
💡 Keep a PDF copy of the signed schedule with the loan agreement — if a payment dispute arises years later, the attached schedule is the controlling reference document.
8
Have both parties sign before disbursement
Obtain signatures from both the lender and borrower before any funds are transferred. The loan calculator and agreement are only enforceable once properly executed.
💡 In jurisdictions requiring witnesses or notarization for loans above a certain threshold (e.g., Quebec), arrange this before the disbursement date — not after.