1
Define the scope and link it to the project charter
Write a one-paragraph scope statement that names the project, the deliverables covered, and any explicit exclusions. Reference the project charter or statement of work so the QA plan and project documents are aligned.
💡 If you cannot write the scope in one paragraph, the project scope itself may not be clearly defined — resolve that first.
2
Set numeric quality objectives
Convert every quality goal into a measurable target: defect escape rate, test coverage percentage, or maximum open defects at release. Record the baseline or industry benchmark next to each target so reviewers understand the standard.
💡 Three to five well-chosen metrics are more actionable than ten vague ones.
3
Assign named owners to every QA role
Replace generic role titles with the actual names or team identifiers responsible for each QA activity. Include a backup owner for critical roles to avoid single points of failure.
💡 Use a RACI table (Responsible, Accountable, Consulted, Informed) if the project involves more than five stakeholders.
4
Map QA checkpoints to the project schedule
Pull your project timeline and insert each QA gate — requirements review, design walkthrough, UAT — as a named milestone with a target date. Flag which checkpoints are hard gates (project cannot proceed without passing) versus advisory reviews.
💡 Hard gates prevent defects from accumulating across phases; if every checkpoint is advisory, the plan has no real enforcement mechanism.
5
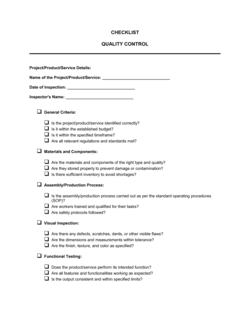
Define entry and exit criteria for each test phase
For each testing type (unit, integration, UAT), write explicit criteria that must be met before testing begins and before it is considered complete. Include the defect severity thresholds that block release.
💡 Exit criteria that include a maximum number of open lower-severity defects are more realistic than requiring zero defects at all levels.
6
Configure your defect tracking tool and log structure
Set up your defect log in your chosen tool — Jira, Azure DevOps, or even a shared spreadsheet — using the severity classification and fields defined in the plan. Confirm all team members have access and understand the workflow before testing begins.
💡 Run a five-minute walkthrough with the team on how to log a defect correctly; inconsistent logging undermines every metric you track.
7
Get sign-off from the project sponsor and client before work begins
Circulate the completed plan to all approvers listed in the plan review section and collect signatures or documented approvals before the first QA activity executes.
💡 Document approvals in writing — email confirmation is acceptable if a formal signature block is impractical, but save it with the plan.
8
Schedule the first plan review at the midpoint milestone
Add a calendar event now for the first scheduled plan review, tied to a project milestone rather than a calendar date. Include the QA manager and project sponsor as required attendees.
💡 A plan review takes 30–60 minutes and prevents the document from drifting out of sync with actual project conditions.