1
Define the organizational boundary and reporting period
Choose operational control or equity share consolidation, list all in-scope entities and facilities, and confirm the 12-month reporting period. Document any exclusions and the rationale.
💡 If you have recently acquired or divested a business unit, determine whether it falls inside or outside the boundary before gathering any data — a mid-year acquisition is typically included on a pro-rata basis.
2
Compile Scope 1 activity data
Pull utility invoices, fleet fuel purchase records, and refrigerant top-up logs for the reporting period. Enter consumption figures into the Scope 1 section with the appropriate unit (liters, kg, cubic meters).
💡 Refrigerant top-up quantities are recorded by service engineers at each maintenance visit — request these logs directly from your HVAC contractor rather than estimating from equipment specifications.
3
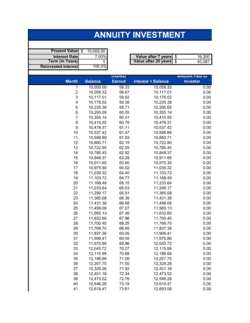
Enter Scope 2 electricity and heat data
Obtain kWh figures from electricity invoices for all sites. Calculate both location-based and market-based totals. If you hold renewable energy certificates, confirm they are retired and attach the retirement records as an appendix.
💡 For multi-site businesses, create one row per meter account number — aggregating sites onto a single row makes auditing significantly harder.
4
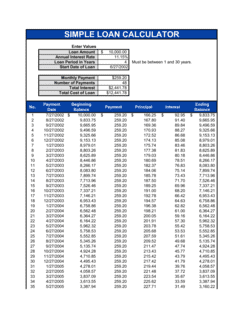
Identify and quantify relevant Scope 3 categories
Review all 15 GHG Protocol Scope 3 categories and mark each as material, not material, or not applicable for your business. For material categories, gather activity data or apply spend-based proxies using the most recent emission factor version.
💡 Start with Categories 1, 3, 6, and 11 — purchased goods, fuel and energy activities, business travel, and use of sold products. For most companies, these four account for over 70% of Scope 3 emissions.
5
Select emission factors and calculate totals
Apply emission factors from a recognized database (UK DESNZ, EPA eGRID, IPCC AR6) matched to the activity type and geography. Multiply activity data by the factor to produce tCO2e for each line item, then sum by scope.
💡 Record the factor version number and publication date in the methodology column — auditors will ask for this, and factor updates are common enough that a version mismatch is one of the most frequent verification findings.
6
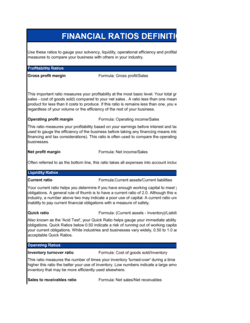
Complete the data quality and uncertainty section
Rate each emission category as high (metered primary data), medium (supplier-specific secondary data), or low (spend-based proxy). Estimate the uncertainty range for the total inventory and disclose data gaps.
💡 A transparent uncertainty disclosure strengthens the credibility of the report — it signals methodological rigor rather than imprecision.
7
Record base year and reduction targets
Enter the baseline year total, set the recalculation threshold, and record any formal reduction targets with their target year, percentage reduction, and the framework or standard they align to.
💡 If this is your first inventory, designate the current year as the base year now — this avoids the need to reconstruct historical data retroactively when you set a target next year.
8
Obtain executive sign-off and arrange verification
Have a named C-suite officer review and sign the attestation block before submission. For regulated disclosures, engage an accredited third-party verifier to conduct at minimum a limited assurance review.
💡 Schedule verification at least 8 weeks before any regulatory or investor submission deadline — verifiers require time to request supporting documentation and issue a formal opinion letter.