1
Complete the report header before the inspection begins
Enter the property address, inspection date and time, weather conditions, your name and license number (or inspector's), and the standards body governing the inspection scope before walking the property.
💡 Record weather conditions even when they seem irrelevant — courts and lenders sometimes challenge findings based on inspection-day conditions.
2
Walk the exterior and site before entering the structure
Inspect the site, grading, drainage, exterior cladding, roof from the ground or ladder, gutters, and all exterior entry points. Photograph every finding immediately with a date-stamped image.
💡 Walk the perimeter in a single clockwise direction so you don't miss sections — inspectors who jump around frequently omit one elevation.
3
Inspect the roof and attic independently
Document roofing material, estimated age and remaining life, flashing condition at all penetrations, and attic insulation depth and ventilation. Note any moisture staining on sheathing or rafters.
💡 Binoculars or a drone photograph can substitute for a ladder if roof access is unsafe — note the method used so the report is not challenged later.
4
Evaluate foundation and structural components
Record foundation type, all visible cracks with orientation and estimated width, floor levelness at multiple points, and any accessible framing in the basement, crawl space, or attic.
💡 Photograph cracks next to a coin or ruler for scale — 'hairline crack' is subjective; a 1/8-inch measurement is not.
5
Test and document all mechanical systems
Operate every electrical circuit, plumbing fixture, and HVAC control. Record readings — water pressure in psi, panel amperage, heater and AC unit ages — rather than just narrative descriptions.
💡 Use the template's age fields to flag equipment within 3 years of its typical service life — this is the most actionable data for a buyer negotiating a repair credit.
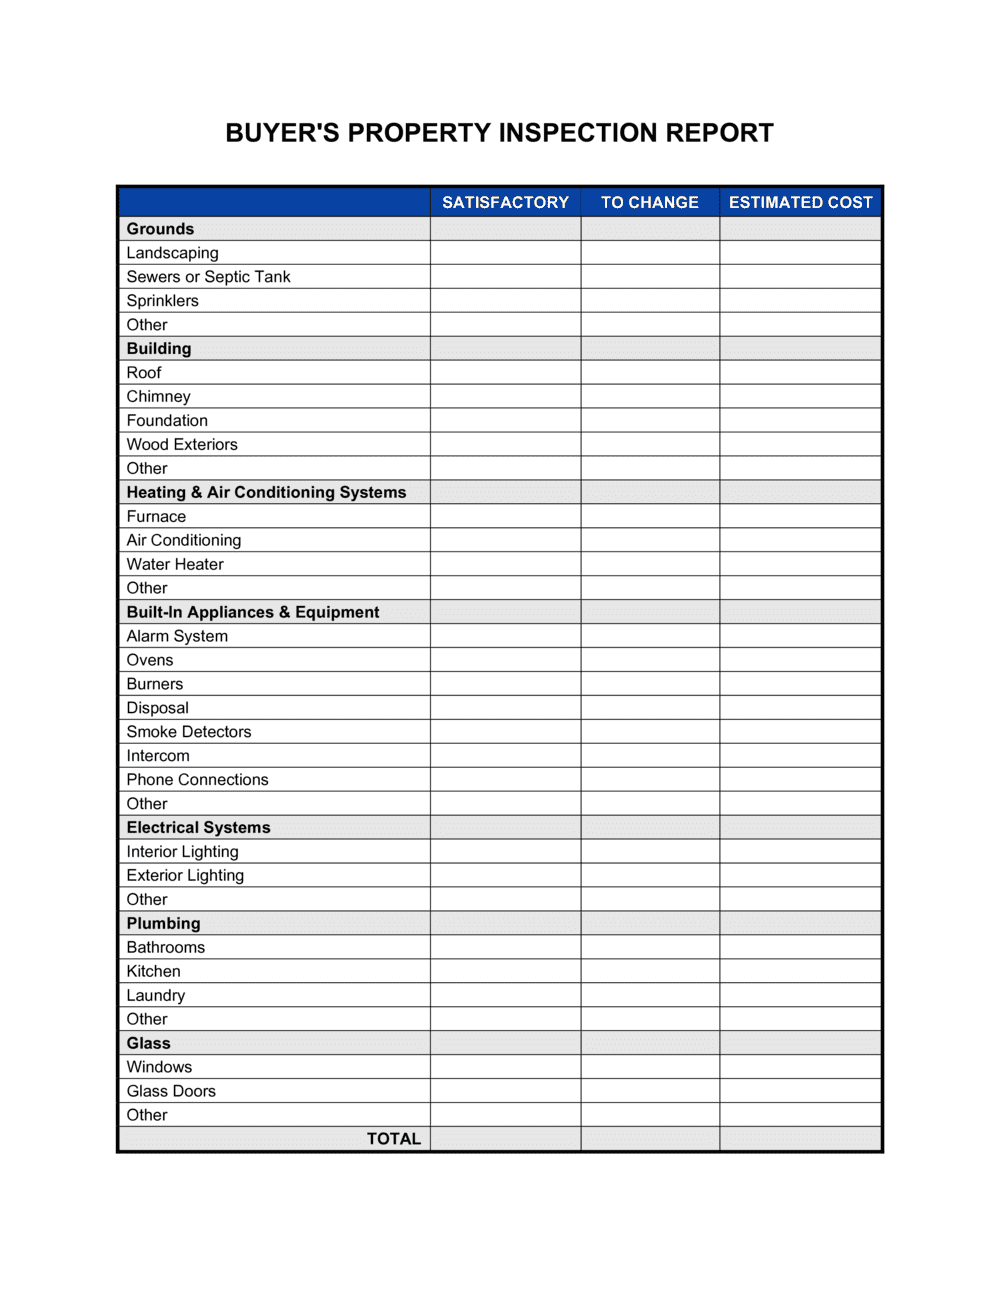
6
Complete the interior room-by-room section
Work room by room, recording wall, ceiling, floor, window, and door conditions. Separate cosmetic defects from functional defects in your notes using the template's two-column format.
💡 Flag any ceiling stain — even old or dry ones — for follow-up. Sellers sometimes paint over moisture damage between listing and inspection.
7
Populate the defect summary with severity ratings
Pull every finding from the body of the report into the summary table and assign a severity tier: Safety Hazard, Major Defect, or Minor/Maintenance. Calculate estimated repair costs where possible.
💡 Limit Safety Hazard classifications to genuinely life-threatening conditions — overusing the designation reduces its impact and your credibility.
8
Draft the repair and credit recommendation section last
Based on the defect summary, identify the three to five items you will request the seller address — prioritizing safety hazards and major defects — and state whether you want a repair or a closing credit for each.
💡 A focused repair request with dollar estimates converts faster than an exhaustive list. Pick the items that genuinely affect safety, habitability, or value.