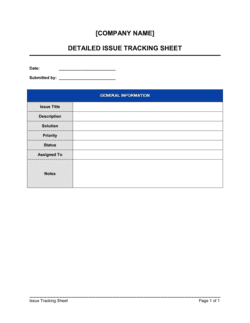
1
Complete the employee identification block on day one of absence
Enter the employee's full legal name, ID number, department, job title, and reporting manager as soon as the absence begins. Open the record at first notification — do not wait until the employee returns.
💡 Pre-populate employee ID and manager fields from your HR system before distributing the form to line managers to prevent identification errors.
2
Log the notification details and initial absence dates
Record the date and time the employee notified their manager, the method used (phone, email, or text), and the stated reason if given. Enter the absence start date and leave the end date open until the employee confirms their return.
💡 If notification was late or by an unauthorized method (e.g., text when your policy requires a call), note this in the record — it may be relevant if the absence is later treated as unauthorized.
3
Classify the leave type accurately
Assign the correct leave category from your defined list. If the reason is unknown at the start, mark it 'pending classification' and update it when documentation is received. Never default to 'sick leave' without confirmation.
💡 FMLA-designated leave in the US and statutory family leave in the UK must be classified correctly on the record — misclassification affects both the employee's entitlements and your legal protections as an employer.
4
Request and log required documentation
Based on your policy and the absence duration, specify the documentation required — self-certification for short absences, a doctor's certificate or fit note for absences exceeding your threshold — and record the deadline for submission.
💡 Set documentation deadlines in the record itself rather than communicating them verbally. A written deadline creates a clear point at which non-compliance can be formally noted.
5
Conduct and record the return-to-work interview
On the employee's first day back, complete the return-to-work section with the interview date, your name, the employee's confirmed fitness status, and any workplace adjustments discussed. Both parties should sign the completed section.
💡 Even for a one-day absence, a brief two-minute return-to-work conversation — documented — reduces repeat short-term absence and creates a consistent record of managerial engagement.
6
Update running totals and calculate the Bradford Factor
Add this absence to the rolling 12-month spell count and day count. Calculate the updated Bradford Factor score (S² × D) and compare it against your trigger-point table.
💡 Use a rolling 12-month window anchored to today's date — not the calendar year — to prevent artificial resets that allow persistent patterns to go undetected.
7
Complete the disability and protected characteristic review before any escalation
Before recording any trigger-point action, complete the protected characteristic review section. Document whether any reasonable adjustments have been considered and whether an occupational health referral is appropriate.
💡 If in doubt about whether an absence pattern may be linked to a disability, make an occupational health referral before initiating formal disciplinary proceedings — this is a recognized good-practice step in UK and Canadian employment tribunals.
8
Obtain employee signature and file the completed record
Present the completed record to the employee, allow them to note any disagreement, and obtain their signature confirming accuracy. Retain the signed record in the employee's personnel file for at least the period required by applicable law.
💡 In the EU and UK, absence records containing health data are special-category personal data under GDPR and UK GDPR — store them with access controls separate from general HR files.