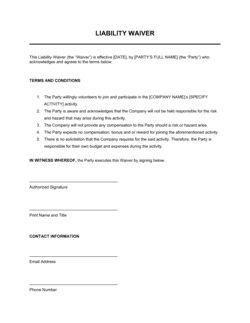
1
Enter your organization's name and contact details
Add your business or organization's full legal name, address, phone number, and email to the header. These details identify who is protected by the waiver.
💡 Use the same legal entity name that appears on your business registration or insurance policy — inconsistencies can create coverage gaps.
2
Describe the specific activity, date, and location
Name the activity precisely — not just 'sports event' but 'trail running race on [TRAIL NAME].' Include the date range and address of the venue.
💡 If the waiver covers multiple sessions (e.g., a 6-week class), list the full date range and note that it applies to all sessions.
3
Write a tailored risk disclosure
List the specific hazards a participant may encounter — physical injury types, equipment involved, environmental factors, and contact risks. Review your actual activity checklist to ensure nothing is omitted.
💡 Ask your activity instructor or facility manager to review the risk list before finalizing. They will know hazards that a generic template misses.
4
Review and customize the release and indemnification language
Ensure the release clause names your organization, its officers, employees, volunteers, and any contracted third parties. Confirm the indemnification clause covers third-party claims.
💡 If you use independent contractors to run the activity, list them by role (e.g., 'certified instructors') in the release to ensure they are covered.
5
Add the emergency contact and medical authorization section
Include fields for the emergency contact's name, relationship, and phone number. Add a checkbox or statement authorizing emergency medical care if the participant becomes incapacitated.
💡 For activities involving minors, make the parent or guardian the emergency contact and require their signature on the medical authorization line.
6
Include the severability clause and entire-agreement statement
Add a standard severability clause and confirm the document represents the complete agreement on participant liability. These lines take two sentences and protect the rest of the form if a single clause is challenged.
💡 Place the severability clause near the signature block — courts are more likely to find it was reviewed when it appears just above where the participant signed.
7
Collect signatures before the activity starts
Distribute the form to every participant at check-in or registration, allow time to read it, and collect signed copies before the activity begins. File all completed forms in a secure, organized location.
💡 Keep signed waivers for at least three years — or longer if your jurisdiction's statute of limitations for personal injury claims exceeds that period.