1
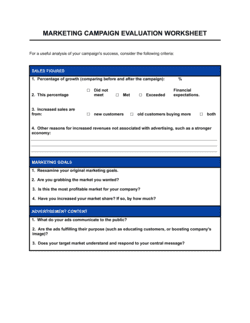
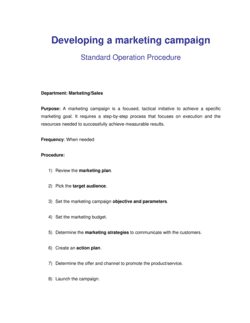
Define the campaign objective and KPI
Enter a single, measurable goal — number of responses, revenue generated, or event registrations — and the date by which you want to achieve it.
💡 A single KPI forces sharper creative and list decisions than a vague awareness objective.
2
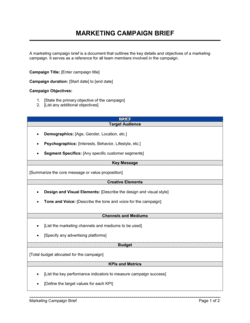
Describe the target audience and select the list
Write out the demographic and behavioral profile of your ideal recipient, then identify whether you will use an internal database, a purchased list, or a saturation mailing by ZIP code.
💡 Request a list count and profile from your broker before committing to a purchase — list quality varies significantly by source and recency.
3
Lock the offer and single call to action
Define one specific incentive and one specific response instruction. Confirm the offer expiration date is realistic given your expected drop date and delivery window.
💡 Test two offers on a split of 20% of the list before mailing the full volume — a stronger offer can double response rates.
4
Complete the copy and design approval checkboxes
Route the copy through whoever reviews claims, pricing language, and brand standards. Check each box only after written sign-off is received.
💡 Save approval emails or comments in a campaign folder — you will need them if a claim is later questioned.
5
Confirm print specifications with the vendor
Get the printer's file specifications in writing before design begins. Record format, dimensions, bleed, color mode, and file type in the checklist.
💡 Request a printed proof — not just a digital PDF — for any campaign above 1,000 pieces before authorizing the full run.
6
Apply list hygiene steps and record results
Run NCOA, remove duplicates, apply suppression files, and confirm CASS certification. Enter the cleaned list count in the checklist before calculating postage.
💡 Your cleaned list count is almost always lower than your raw count — build a 10–15% shrinkage buffer into the budget from the start.
7
Record the budget and confirm drop date
Fill in each cost line — list, creative, print, postage, mail house — and total them. Confirm the drop date with the mail house or postal clerk, then work backward to set internal deadlines.
💡 Add two business days of buffer between your art-final deadline and the printer's file-due date. Late files always cost more.
8
Set up response tracking before mailing
Provision a unique phone number, landing page URL, or coupon code before the drop date. Enter the tracking method in the checklist and confirm it is live and tested.
💡 Test the URL and phone number yourself on drop day — broken tracking methods waste the entire campaign's measurement potential.