1
Create a new file for each vendor
Open a new copy of the checklist for every vendor you onboard. Assign a unique vendor code that matches your accounting or ERP system and record the date the file is opened.
💡 Use a naming convention like VEND-[YEAR]-[SEQUENCE] so files sort chronologically in shared drives.
2
Collect and verify vendor identification
Enter the vendor's full legal name as it appears on their business registration — not just the trade name. Confirm the entity type (LLC, corporation, sole proprietor) so you know whether a W-9 and 1099 will be required.
💡 Ask the vendor to provide a copy of their business registration or articles of incorporation to confirm the legal name at onboarding.
3
Request and log the W-9 or equivalent tax form
Send the vendor a W-9 request before issuing any purchase orders. Record the date received and file the original. For international vendors, request a W-8BEN or W-8BEN-E instead.
💡 Set a calendar reminder to re-collect the W-9 any time the vendor's name, address, or entity type changes — the IRS requires an updated form when information changes.
4
Verify banking details with a confirmation call
Enter ACH or wire payment details only after a verbal confirmation call to the vendor's known main number — never rely solely on emailed banking information. Record the name of the person who confirmed the details.
💡 Document the confirmation call in the notes field with the date, time, and the vendor contact's name to create an audit trail.
5
File the Certificate of Insurance and note the expiry date
Attach the COI to the vendor file and record coverage types, limits, and the expiration date in the checklist fields. Add the expiry date to a shared calendar or procurement tracker.
💡 Set a 60-day advance reminder for COI renewals — vendors often need time to request an updated certificate from their insurer.
6
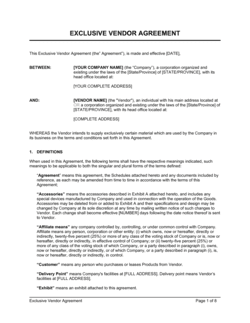
Confirm a signed supplier agreement is on file
Check the contract reference number, effective date, and next review or expiry date. If no agreement is in place, flag the file as pending and escalate to the procurement or legal team.
💡 Never mark a vendor as fully approved until a signed agreement is attached — verbal arrangements are the single biggest source of supplier disputes.
7
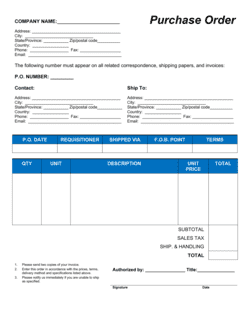
Record payment terms and obtain manager approval
Enter the agreed payment terms and any credit limit, then route the completed checklist to the approving manager. Record their name, signature (if required by your process), and approval date.
💡 Require a second reviewer for any vendor with a credit limit above a defined threshold — segregation of duties reduces payment fraud risk.
8
Add the vendor to the approved vendor list
Once all fields are complete and approval is recorded, update your approved vendor list or ERP system to reflect the vendor as active. File the completed checklist in the vendor's central record.
💡 Store completed checklists in a shared, permission-controlled folder — not individual inboxes — so any team member can access the file during audits or staff transitions.